How To: Vintage Carnival Pinwheels (Not Spinning)
I absolutely love a vintage carnival for a birthday or corporate picnic. They are really versatile in that they can be really light and fun for corporate as well as for children, but they can also go a little dark and sexy for adults. Here are some really cute pinwheels for the light and fun version of a vintage carnival!
STEP 1: Gather the Materials
- Light to Medium Weight Cardstock
- Printer with Color Ink
- Scissors
- Hot Glue Gun with Clear Glue Sticks
- Thin Wooden Stakes (You should be able to find these at hardware stores in the gardening section.)
- Optional - Jewels or Buttons without holes
STEP 2: Gather Images and Patterns
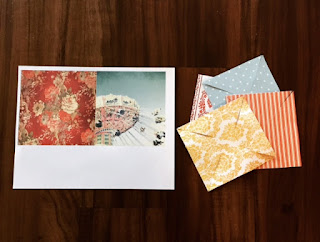
For this step, I like to go to free stock images sites and look for carnival themed graphics as well as antique looking fabric patterns. I will usually have something very detailed on one side and pair it with a simpler pattern for the other side. Think about how the two will look next to each other, but don't be afraid to be a little adventurous!
STEP 3: Print the Images
Using a good printer, print a detailed image on the front of the cardstock and a simpler image on the back of the cardstock. For small pinwheels, you should be able to get two images out of one page. For large pinwheels, it will take a full page for one.
STEP 4: Cut Out the Images
Cut out the square images. Then, from each corner, cut from the pointed end straight toward the center. Leave much of the center of the square uncut as this holds the pinwheel together.
STEP 5: Assemble
Using the hot glue, attached a wooden stake to the center of the pinwheel. Then hot glue one corner from each side to the wooden stake at the center.
Optional - Finish by gluing a jewel or fabric button to the center.


STEP 1: Gather the Materials
- Light to Medium Weight Cardstock
- Printer with Color Ink
- Scissors
- Hot Glue Gun with Clear Glue Sticks
- Thin Wooden Stakes (You should be able to find these at hardware stores in the gardening section.)
- Optional - Jewels or Buttons without holes
STEP 2: Gather Images and Patterns
For this step, I like to go to free stock images sites and look for carnival themed graphics as well as antique looking fabric patterns. I will usually have something very detailed on one side and pair it with a simpler pattern for the other side. Think about how the two will look next to each other, but don't be afraid to be a little adventurous!
STEP 3: Print the Images
Using a good printer, print a detailed image on the front of the cardstock and a simpler image on the back of the cardstock. For small pinwheels, you should be able to get two images out of one page. For large pinwheels, it will take a full page for one.
STEP 4: Cut Out the Images
Cut out the square images. Then, from each corner, cut from the pointed end straight toward the center. Leave much of the center of the square uncut as this holds the pinwheel together.

STEP 5: Assemble
Using the hot glue, attached a wooden stake to the center of the pinwheel. Then hot glue one corner from each side to the wooden stake at the center.
Optional - Finish by gluing a jewel or fabric button to the center.


Comments
Post a Comment